Places where water, oil and chemical substances are splashed.
Places containing explosive and flammable gases.
2. Properties of Products
Power supply: AC 220V / 1 phase, -10~+10﹪, UK plug. (We can customize the voltage and plug such as 380V, US plug, EU plug).
Consumption of electricity: 2100W max (1012WA) / 3900W max (1018WA) / 4200W max (1024WA) / 4500W max (1030WA)
Indoor temperature: -10℃~40℃
Indoor humidty: 35~85﹪
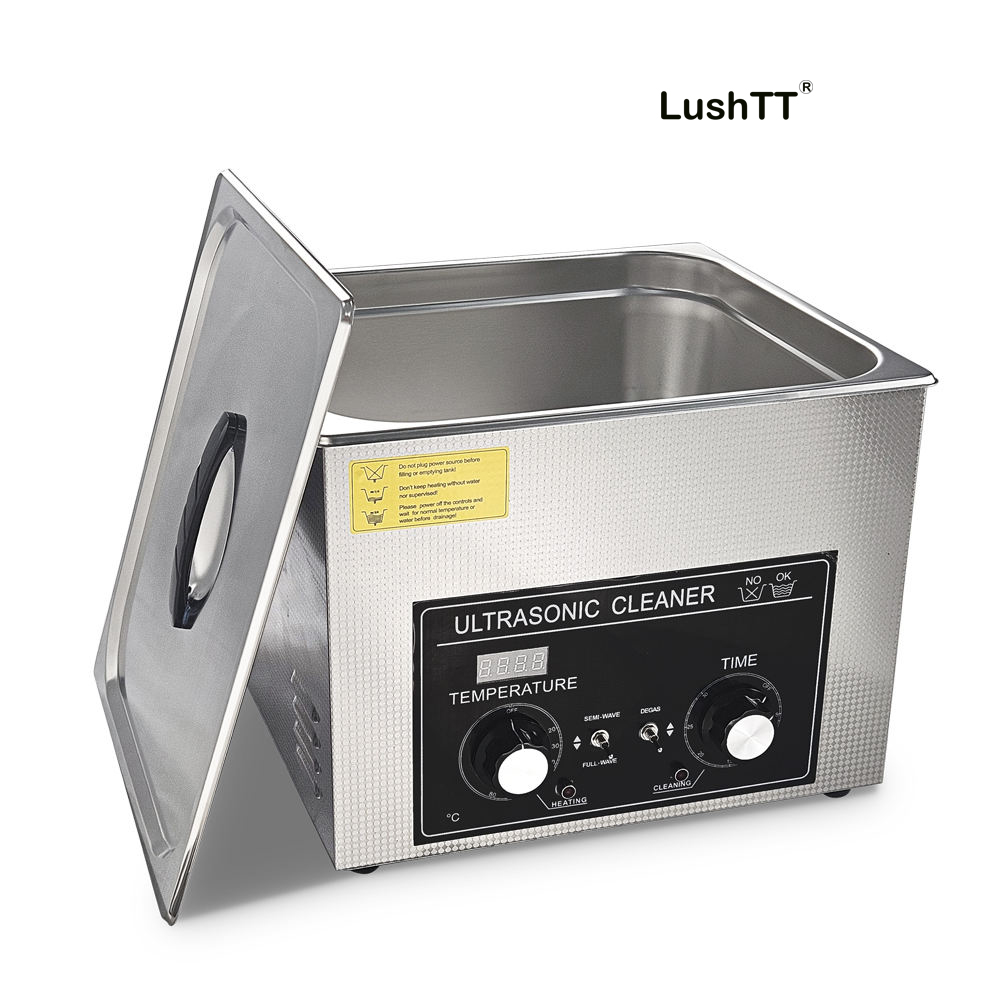
Working tank size: 500*300*250mm, tank capacity: 38L, overall machine size: 850*500*650mm.
3. Overall Review of the Machine
The machine is made of high-quality stainless steel material, which is strong corrosive-resistant and can offer a long service life. It uses original high-performance and high-quality ultrasonic transducers from South Korea, combined with advanced bonding technology. The electrical-to-acoustic conversion efficiency is high, and the ultrasonic output power is strong. It is equipped with an automatic temperature control heating device, with a temperature control range of: room temperature to 95℃.
It is suitable for cleaning work pieces in various industries, such as cleaning of precision electronic components, clock parts, optical glass parts, metal mechanical parts, jewelry, semiconductor silicon wafers, polyester filter cores / spinning plates, medical devices, etc., as well as cleaning before and after electroplating of parts.
4. Construction and Function
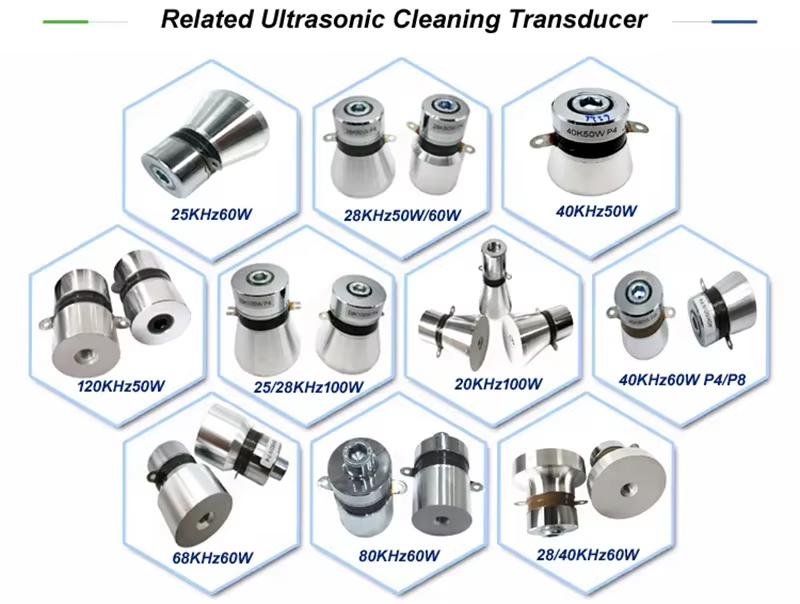
4.1. Ultrasonic generator: Outputs 28KHZ electrical power signals which are supplied to the transducers. It is equipped with an automatic frequency tracking and compensation circuit, has strong anti-interference ability, and has high output frequency accuracy.
4.2. Transducer: Converts electrical power signals into high-frequency mechanical vibrations. It uses original Korean transducers, featuring an excellent performance such as a wide frequency band, high energy conversion rate, high reliability, and high power factor of the power gride.
4.3. Constant temperature automatic heating system: composed of electric heating pipes, digital display temperature control and switches, etc.
4.4. Time control device: The user can set the cleaning time required for the workpiece, ranging from 1 to 99 minutes. It can be set for timed operation or kept in constant ON/OFF mode.
4.5. Temperature control device: It is recommended to use a temperature above 60°C (the optimal cleaning temperature for ultrasonic cleaning machines is 50-60°C). When using flammable cleaning agents for cleaning, the temperature setting device should not be used.
4.6. Ultrasonic control 4.6.1. Install transducers with 28khz with total 12pcs, ultrasonic power 0-600W adjustable.
4.6.2. Install heating pipes with 1.5KW.
4.6.3. Built-in ultrasonic generator which controls the ultrasonic tanks independently. Do not modify the parameters on the generator without the manufacturer’s consent.
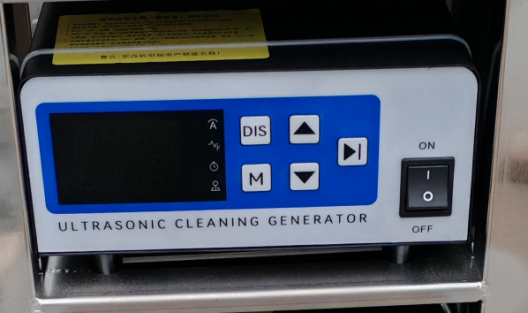
4.6.4. Control panel of ultrasonic generator
Ultrasonic power adjustment:adjust the power potentiometer, and the power can be adjusted from zero to the rated power.
Power on/off:1 means on, 0 means off.
Display window:the current when the generator is operating displays on the left, the time and the frequency displays on the right.
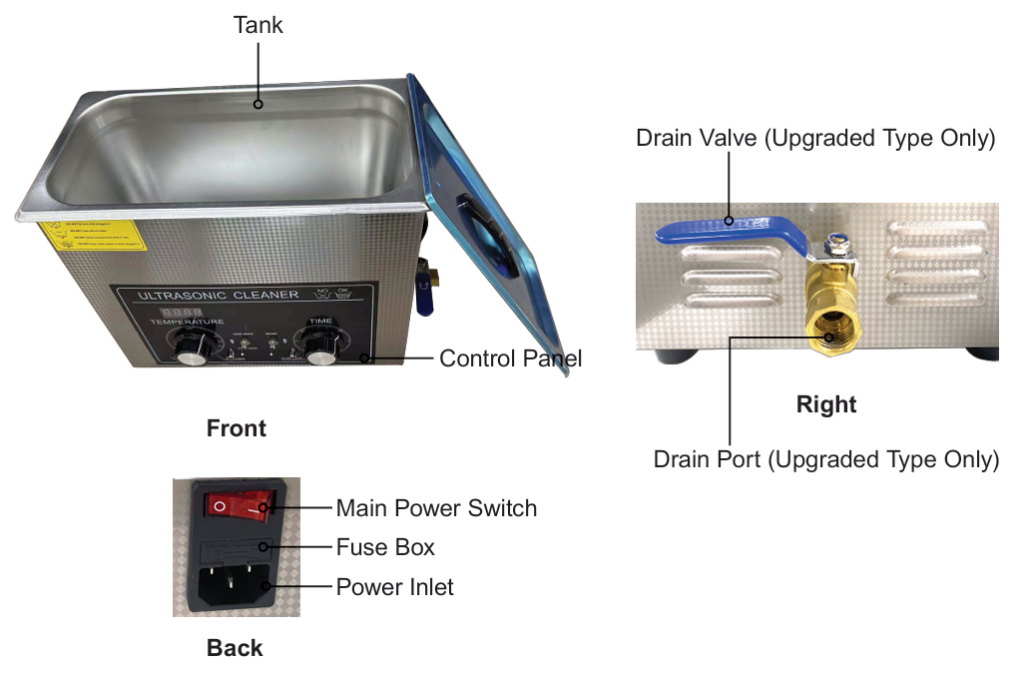
Power cord: The connecting device that links the machine to the mains power supply. Pay attention to ensuring good grounding.
Output connection port: The connection point between the ultrasonic cleaning machine and the generator. Please note that the positive and negative polarities must not be reversed.
Remote control: it is the soft start interface of the generator, continuously supply power to control the start and stop of the ultrasonic. When using it, simply remove the shorting wire inside the plug and connect an external switch or relay instead, and give it a switch signal.
****Notice:Do not modify the parameters on the generator without the manufacturer’s consent ***************
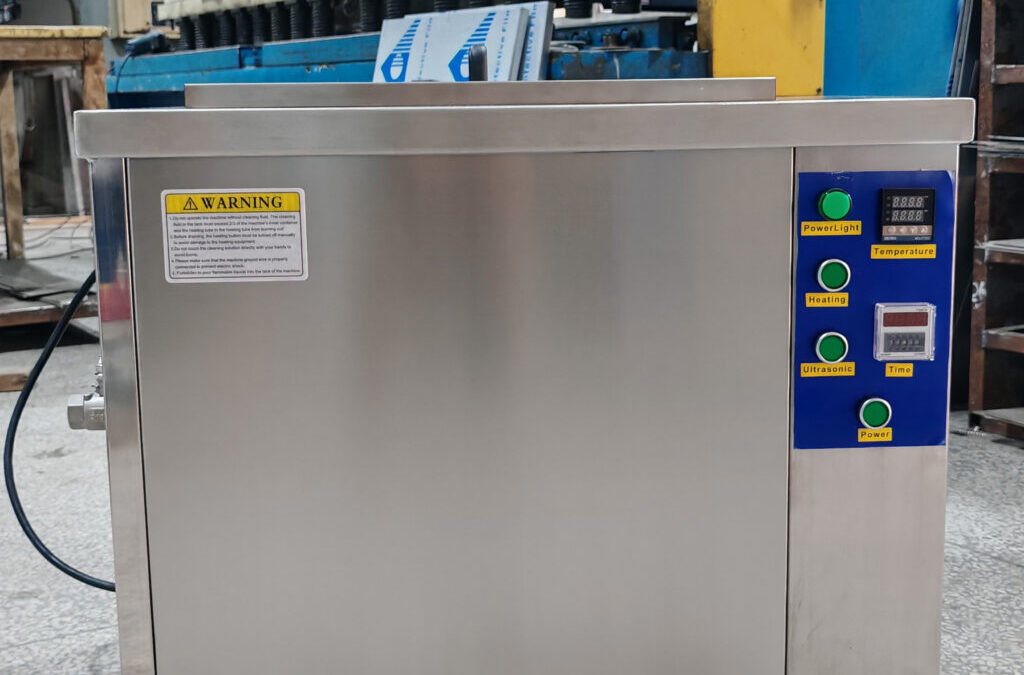
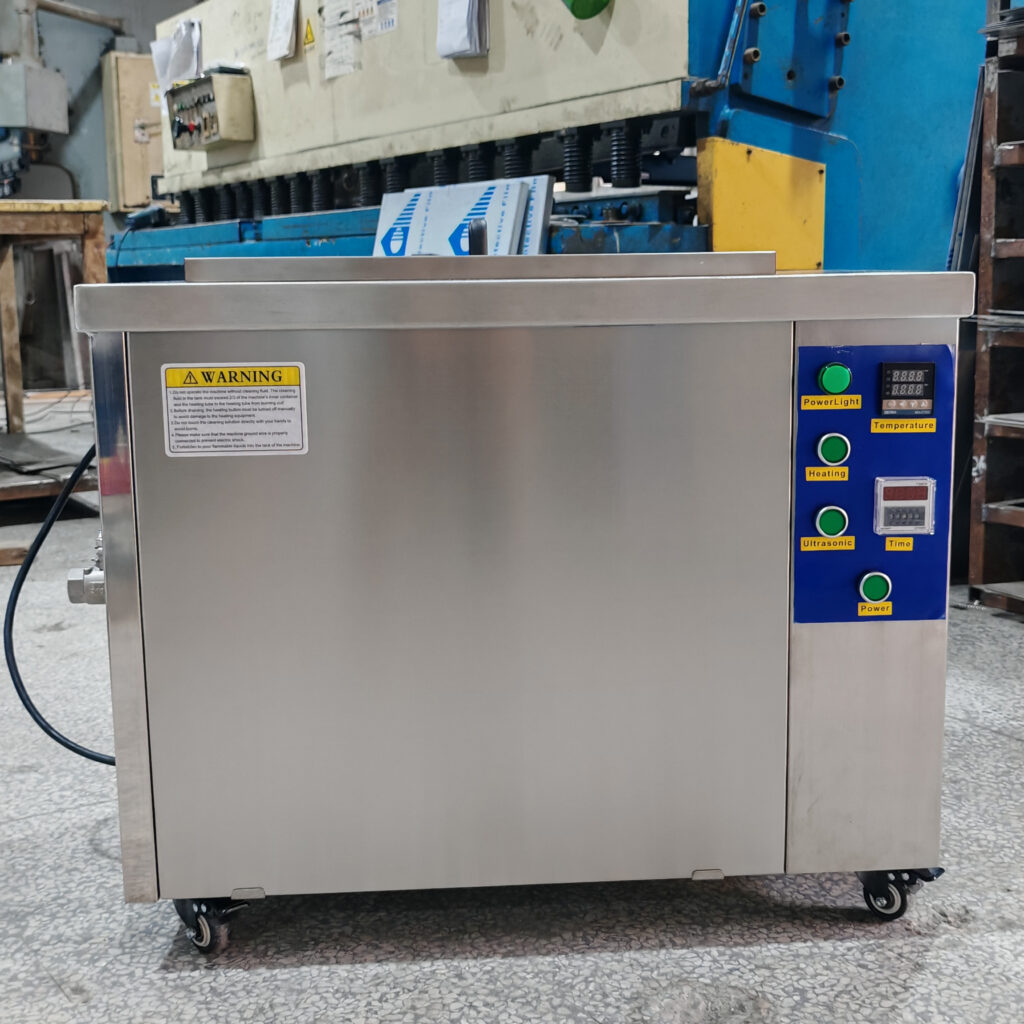
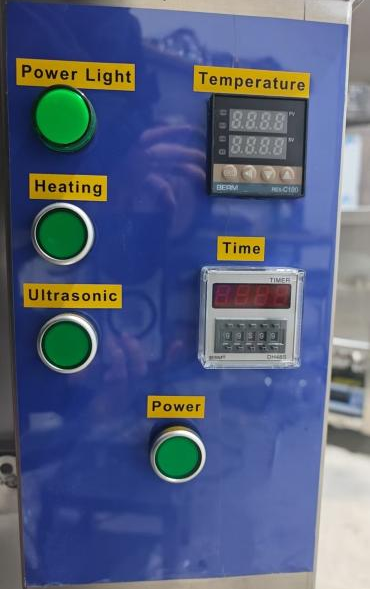
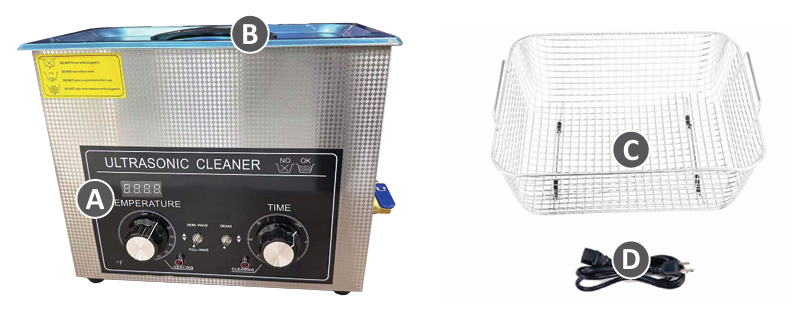
4.7. Control panel of the cleaning machine
4.7.1 Power: Press it to turn on / off the power of the machine.
4.7.2 Power Light: It is in Green light when the power supply is normal and working good. The light went out indicating that there is a problem with the power supply.
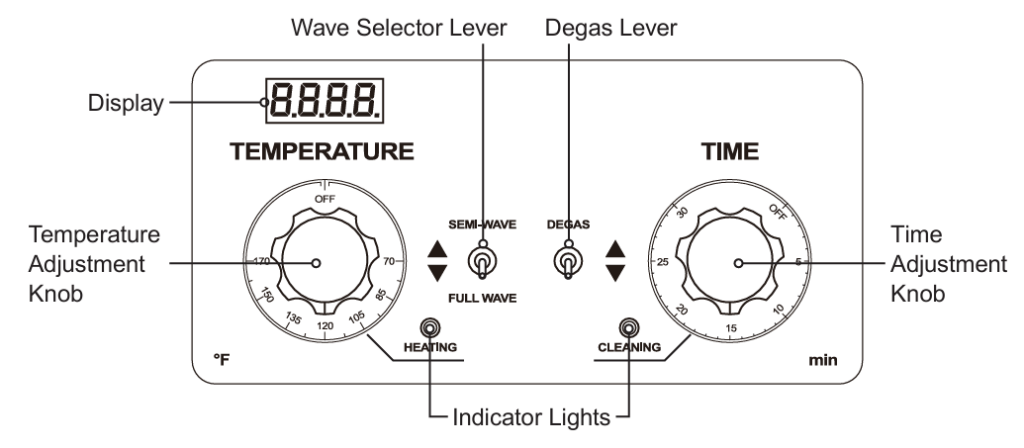
4.7.3 Temperature display window: To display the set temperature and the actual temperature.
4.7.4 Heating: composed of electric heating pipes, press this button to activate the heating function or turn off the heating.
4.7.5 Ultrasonic: Press this button to activate the ultrasonic cleaning function or turn off the ultrasonic. When turned on, a countdown timer starts. Once the time reaches zero, the ultrasonic output will automatically stop. You can also temporarily disable the ultrasonic output function and then restart to continue the countdown.
4.7.6 Time: Set and display the ultrasonic cleaning time.
5. The basic principle of ultrasonic cleaning technology
Using ultrasonic transducers (crystal head) to emit high-frequency ultrasonic waves. 28,000 times (28KHZ crystal head) oscillations are generated per second. The liquid is used as the transmission medium. Since ultrasonic waves are a compressive longitudinal wave, their effect on the medium causes pressure changes in the liquid, resulting in countless tiny air bubbles. This causes the cavitation effect. When the bubbles are compressed and burst, a powerful impact force is generated. During this cavitation phenomenon, when the bubbles close, an instantaneous high pressure of over 1000 atmospheres is formed. There are countless bursts and reconstructions in an instant, which can quickly loosen and remove grease, wax, and dirt attached to the surface, recesses, or hidden areas of the object, achieving a thorough cleaning effect without damaging the surface of the workpiece. This cavitation erosion effect is the basic principle of ultrasonic cleaning.
6. Cleaning Liquid Instruction
Suitable for cleaning in aqueous solutions. It is recommended to prefer neutral solvents/reagents.
7. Matters Need Attention Before Operation
The machine should be placed in a well-ventilated and dry place.
The system activation key of the ultrasonic generator is set to the “OFF” position.
Fill the cleaning liquid in the 1st ultrasonic cleaning tank and 2nd ultrasonic rinsing tank with 2/3 or 3/4 of the entire tank.
Avoid the cleaning liquid spill onto any electrical parts, especially the ultrasonic transducers.
When there is no cleaning liquid in the cleaning tank, do not press the ultrasonic button to activate ultrasonic function. Otherwise, the ultrasonic transducers will be damaged.
When there is no cleaning liquid in the cleaning tank or the liquid level is below the heating pipe, do not press the heating button to activate heating function; otherwise, the ultrasonic transducers and the heating pipes will be damaged.
No object should come into direct contact with the bottom of the working tank. If any foreign object falls into the bottom of the tank, it should be removed immediately. Otherwise, it will damage the ultrasonic transducers or tank.
Do not allow any liquid to splash onto the transducers and the ultrasonic generators.
When there is excessive sediment in the cleaning tank, it is necessary to drain the liquid and rinse it clean in time.
Do not drain the liquid until the the temperature of the liquid approaches room temperature. This is to prevent the deformation of the side tank of the heating pipe.
8. Operation Instructions
8.1. The machine is installed stably and the casing is well grounded.
8.2. Connect the main drainage pipe at the bottom of the body to the drainage system of the factory.
8.3. Connect the power cord and ultrasonic cable as required and ensure a secure connection.
8.4. Inject the cleaning solution to the working liquid level.
8.5. Set the temperature (it is recommended to use a temperature of ≥ 60℃), then turn on the heating power switch.8.6. Adjust the ultrasonic power adjustment knob to the minimum, turn on the ultrasonic power switch, and after the oscillation is normal, adjust the power to the desired size.
9. Application
Ultrasonic cleaning machine can be used to clean various items in multiple industries.
Aerospace and aviation: precision components, electronic circuit boards, aircraft hubs, braking systems, air conditioning heat exchangers, bearings, various metal parts.
Railway: various gate valves, brake valves, shock absorbers, bearing kits, passenger cars, refrigeration units of refrigerated trucks for condensers, radiators, engine components and parts of locomotives, electrical components and parts.
Automobile and motorcycle manufacturing: cylinder blocks,covers, steering mechanisms, shock absorbers and various machined parts, chassis, hub painting before electrophoretic treatment, oil removal, rust removal and oxide removal.
LCD manufacturing: LCD substrates before applying ITO film, etching of LCD substrates, pre-process of filling in liquid crystal, and post-process cleaning.
Optical devices: camera lenses, microscopes, telescopes, glasses, watch glasses, cleaning of optical lenses after grinding and before coating.
Container types: various oral liquid containers, food glass and metal containers, cosmetic containers, packaging containers, dental instrument cleaning and inspection plates.
Medical equipment: endoscopes, surgical instruments, syringes, test tubes, biochemical test containers, blood and tissue fluid on glass slides, kinds of contaminants.
Extraction of active ingredients from traditional Chinese medicinal herbs: replacing the traditional high-temperature water extraction process, this method is highly efficient and protects the active ingredients.
Electronic manufacturing, communication, computer : SMT soldering, post-welding flux and impurity on PCB boards.
Microelectronics: process of cleaning in the manufacturing of single-crystal silicon wafers and integrated circuits.
10. Maintenance
Regularly use a high-pressure air blower to remove dust from the electrical control components.
Clean the working tanks at least once a week
The ultrasonic driving circuit board must be kept dry. It should not be stored in a humid environment. Otherwise, it may damage the machine.
When the ultrasonic cleaning machine is not in use, turn off the power supply of the ultrasonic generator.
Avoid colliding with or subjecting the machine to violent vibrations.
The generator of the ultrasonic cleaning machine and the cleaning tank should be placed away from heat sources and in a place with less dust.
The ultrasonic cleaning machine should not be operated for an extended period of time. If it operates for around 4 hours, it should be stopped for at least 5 minutes.
Place the machine in a well-ventilated area so that it can dissipate heat properly.
To ensure the cleaning effect, the cleaning solution or cleaning liquid should be replaced in time.
Do not start the machine without water.
Try to avoid the use of strong acidic or alkaline cleaning agents.
After the cleaning process is completed and the machine is turned off, if it will not be used for a long time, the cleaning solution (cleaning liquid) should be drained. The machine body and its surrounding areas should be cleaned.
When using ultrasonic cleaning machines to clean objects with flammable liquids (such as alcohol, cleaning solution for plates, banana water, etc.), please be cautious when heating.
(Upgraded Type Only) Turn the drain valve clockwise to close it completely.
(Upgraded Type Only) Connect the drain port to a sink or an appropriate container through a drain hose (not included).
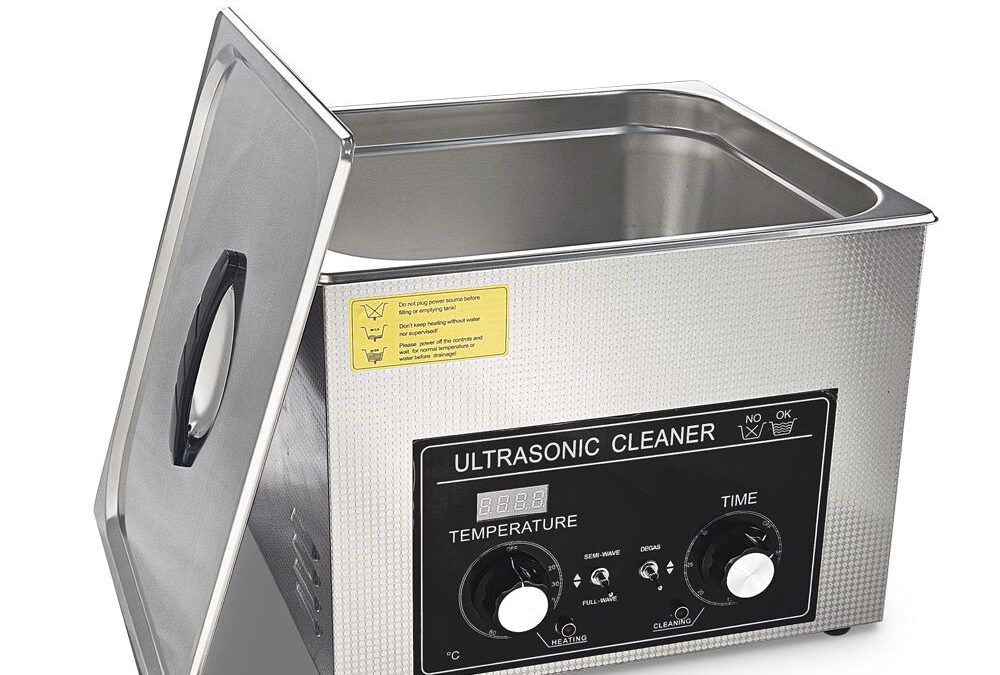
Remove the lid from the top of the ultrasonic cleaner.
Fill the tank with the cleaning fluid appropriate for your task. Be careful that its level will NOT exceed the ⅖ inches (1 cm) of the top once your items are added. NEVER operate this device with less than ⅓ of its tank height.
Place the provided mesh basket and its handles in the tank.
Place the items to be cleaned into the basket gently, ensuring your items are FULLY submerged while the fluid remains BELOW the ⅖ inches (1 cm) of the top.
Remove excess fluid appropriately if necessary.
Replace the lid.
D2. Power On
Connect the device to a stable, compatible, and well-grounded power source using the provided power cord. DO NOT use a 3-to-2 prong adapter or ungrounded extension cord.
Flip the power switch behind the device to —. The control panel should be displaying the current temperature of the fluid.
D3. Cleaning Procedure
(Optional) Turn the Temperature Adjustment Knob to select a temperature. The HEATING indicator turns on. The set temperature needs to be higher than the fluid’s current temperature. The temperature display shows the fluid’s current temperature.
Note:
You can also perform ultrasonic cleaning while heating, but if the cleaning time is too short, it is recommended to preheat to the set temperature before starting cleaning, or you won’t be able to clean items at the temperature you set.
Set a temperature slightly lower than your desired temperature if the heating and cleaning functions are to be active simultaneously, as there may be a slight temperature increase during ultrasonic cleaning.
The actual temperature may be higher than the set temperature while the oscillation is in process. This is normal.
Choose the proper wavelength using the wave lever. Flip the lever up for semi-wave cleaning, and flip the lever down for full-wave cleaning. Note: The semi-wave is a cleaning mode gentler than the standard mode. The full-wave is the standard cleaning mode.
(Optional) Turn on degas by flipping the degas lever up. When turned on, the degassing is performed after every 9 seconds of cleaning.
Turn the Time Adjustment Knob to select the time. If no knobs or levers are turned after this, the cleaner will automatically begin cleaning.
Note:
The product may produce some noise while using the cleaning function, but rest assured it’s a normal occurrence.
You can change the cleaning wavelength and turn off or on the degas function during the cleaning process. Changing either the wavelength or degas does not interfere with the normal cleaning.
D4. After Cleaning
(Optional) Turn the Temperature Adjustment Knob to OFF.
Flip the main power switch to O and disconnect the device from power.
Open the lid and remove the basket from the tank. Be careful with hot water vapor, and use tools to take out items.
Remove the fluid from the device.
For the basic type, pour out the fluid by tilting the device.
For the upgraded type, turn the drain valve counterclockwise completely to open it completely, fully drain the fluid, and turn the valve back in place.
5. Wait till the items have cooled to room temperature and remove them from the mesh basket.
6. Rinse any remaining detergent off their surfaces with clean water as needed.
7. Use a soft cloth to dry the exterior of your items, the tank, and the basket, or allow time for everything to air dry.
8. Replace the basket and lid
E. Maintenance
Turn off and unplug this device before any draining, cleaning, maintenance, or repair.
Check the parts of this device for any wear, damage, or malfunction between uses. Repair or replace any problematic parts before further use.
If this device is not to be used for an extended period, unplug, drain, and fully dry it before storing it in a cool, dry, and clean place inaccessible to children and away from direct sunlight and rain.
F. Troubleshooting
Possible Problems
Usual Solutions
Startup failure or sudden shutof
1. Ensure the power cord is firmly and fully inserted into the power inlet and a working power source. 2. Ensure no damage to the power cord. Replace it with a new identical one if needed. 3. Ensure the main power switch at the back of the device is in its position. 4. The fuse in the main power switch of the cleaner may have been fried. Contact a professional for repair.
Heating failure
Ensure the set temperature is higher than the fluid’s current temperature.
Oscillation failure
Make sure you turn the Time Adjustment Knob after setting.
Insufficient cleaning performance
1. Replace the cleaning fluid if it has become too contaminated. 2. Ensure the tank and basket are clean before resuming your work. Clean them as needed. 3. Ensure the cleaning fluid, temperature or time settings are appropriate for your items.
G. Disposal
Electrical products should not be disposed of with household products. In the EU and UK, according to the European Directive 2012/19/EU for the disposal of electrical and electronic equipment and its implementation in national laws, used electrical products must be collected separately and disposed of at the collection points provided for this purpose. Locations in Australia, Canada, and the United States may have similar regulations. Contact your local authorities or dealer for disposal and recycling advice.
Read all instructions before using the device and save these instructions. Use this device ONLY in accordance with these instructions and for its intended purpose.
This device can be used by children aged 8 and above and persons with reduced physical, sensory, or mental capabilities, ONLY IF (1) they have been given supervision or instruction concerning the use of the appliance in a safe way, (2) they understand the hazards involved, (3) there are persons capable of safely using this appliance present during the entire process of use.
Keep the device and its cord out of the reach of children under 8 years old.
If the supply cord is damaged, cease using it and have the cord replaced by the manufacturer, its service agent, or similarly qualified persons before resuming use.
Cleaning and user maintenance shall not be done by children without supervision.
ONLY use this device with a stable, compatible, and well-grounded power source. DO NOT use 3-to-2 prong adapters, ungrounded extension cords, or extension cords of insufficient gauge for this device’s expected electrical load.
ALWAYS keep the air inlet free of any obstruction.
DO NOT modify the power plug or move this device by pulling on its power cord. In case of power loss during operation, unplug it IMMEDIATELY until power is restored.
ALWAYS disconnect this device from power before filling up or draining fluid.
DO NOT allow this device to run dry or with excessive fluid.
NEVER fill the tank above the recommended maximum height mark or within ⅖ inches (1 cm) of the top if there is no such mark. NEVER operate this device with less than ⅓ of its tank height.
DO NOT use volatile solvents with low boiling temperatures. Ultrasonic waves can cause them to heat up and release fumes.
DO NOT use this device around flammable, explosive, or corrosive objects or fumes.
DO NOT get any electrical components wet or operate them with wet hands or in highly humid environments. If they become wet accidentally, disconnect them from power and allow time for them to dry completely before further use.
DO NOT leave this device unattended or its lid open during use.
DO NOT place any body parts in the tank during use.
ALWAYS unplug this device immediately after use.
DO NOT place or store this device where it can fall or be pulled into a tub or sink.
DO NOT immerse the device in water or other liquid.
DO NOT reach for the device that has fallen into the water. Unplug immediately.
DO NOT remove the lid before or immediately after the heating is turned off, as hot steam may burn your bare skin.
ALWAYS disconnect this device from power before performing any cleaning, maintenance, or repair.
DO NOT operate this device if it malfunctions or shows signs of damage. Repair or replace damaged components before further use. NEVER replace any parts with nonidentical ones.
Standard ultrasonic cleaning is NOT recommended for porous items like corals or gemstones, such as pearls, emeralds, and opals. Apply degassing and gentle cleaning for them.
DO NOT use fluids that can damage the stainless-steel surface of the tank, such as strong acids or bases.
For aqueous fluids, deionized, demineralized, or distilled water is recommended to avoid harmful impurities.
DO NOT drop items or place them directly into the tank, as both actions may damage the transducer before or during use. ALWAYS deposit items into the tank gently and use the provided basket to hold them.
To extend the service life, DO NOT operate this device for more than 30 minutes continuously.
ALWAYS remove all items before emptying the used fluid from the tank.
For the ultrasonic cleaner with a drain valve, remember to close the drain valve before filling the tank.
1. Cleaning Solution: The cleaning solution used in ultrasonic cleaning can vary depending on the application and the type of contaminants to be removed. Water is commonly used as a base, and specific detergents or cleaning agents are added to enhance the cleaning process. These additives can include surfactants, solvents, rust inhibitors, degreasers, or specialized chemicals tailored for particular cleaning tasks.
2. Frequency and Power: Ultrasonic cleaners operate at various frequencies, typically ranging from 20 kHz to 400 kHz. The frequency selection depends on factors such as the size of the contaminants, the material being cleaned, and the desired cleaning intensity. Higher frequencies are generally used for delicate items or fine cleaning, while lower frequencies are suitable for heavy-duty cleaning tasks. The power of the ultrasonic cleaner is also adjustable to control the intensity of the cleaning process.
3. Cleaning Applications: Ultrasonic cleaning is employed in a wide range of industries and applications. Some common examples include:
1). Jewelry and Watchmaking: Ultrasonic cleaners are effective at removing dirt, oils, and polishing compounds from intricate jewelry pieces, gemstones, and watches.
2). Electronics: Electronic components, circuit boards, and delicate parts can be cleaned without causing damage or disrupting the functionality of the devices.
3). Automotive: Ultrasonic cleaning is used to clean engine parts, carburetors, fuel injectors, and other automotive components.
4). Medical and Dental: Medical instruments, surgical tools, dental equipment, and prosthetics can be thoroughly cleaned using ultrasonic technology.
5). Optics: Lenses, eyeglasses, camera equipment, and other optical devices benefit from ultrasonic cleaning to remove smudges, oils, and contaminants.
4. Considerations and Limitations: While ultrasonic cleaning is highly effective, there are some considerations and limitations to keep in mind:
5. Material Compatibility: Certain materials may be sensitive to ultrasonic cleaning, such as soft plastics, porous materials, or items with loose components. It’s important to ensure that the object being cleaned is compatible with the ultrasonic process.
6. Size and Shape: The size and shape of the objects being cleaned should be taken into account when selecting an appropriate ultrasonic cleaner. Objects should fit comfortably within the cleaning tank without overcrowding, allowing the sound waves to reach all surfaces.
7. Precautions: Safety precautions should be followed, including the use of appropriate personal protective equipment (PPE) and ensuring proper ventilation when working with cleaning agents.
Overall, ultrasonic cleaning is a versatile and efficient method for removing contaminants from a wide range of objects and materials, offering improved cleaning results and productivity compared to traditional cleaning methods.
To extend the service life of your ultrasonic cleaner, please ensure that you store and maintain it properly after use. The following tips will help you do this:
1. The ultrasonic drive circuit board should be kept dry and should not be stored in a humid environment, otherwise it will be in the risk of burning out the machine.
2. Turn off the power of the ultrasonic generator when the ultrasonic cleaner is not in use.
3. Avoid bumping or violent vibration to the machine.
4. Ultrasonic cleaner generator and cleaning tank should be far away from heat source.
5. Try not to work the ultrasonic cleaner for a long time, stop for more than 5 min. after working for several hours.
6. The machine should be placed in a ventilated place as much as possible to facilitate the machine to dissipate heat.
7. It is strictly forbidden to start without water or fluid, must work above the liquid level.
8. When the ultrasonic cleaning machine uses flammable liquid such as alcohol, chemical to clean objects, please consult with our customer service first before using the machine.
9. Try to avoid the use of strong acid and alkali cleaning agent.
10. In order to ensure the cleaning effect, the cleaning fluid should be replaced in time.
11. After the cleaning is completed and the machine is turned off, use a clean try rag to clean the tank body and its periphery after pouring out the cleaning agent.
12. After using the cleaner, cover it, keep the shell clean, store it in a dry, ventilated and dust-free place.
Ultrasonic cleaning is a process that uses high-frequency sound waves to agitate a cleaning solution, creating tiny bubbles that gently scrub and remove contaminants from the surface of objects. The cleaning solution used in an ultrasonic cleaning machine can vary depending on the specific application, but here are some common cleaning agents that can be used:
Water: Water is a universal cleaning agent that can be used in ultrasonic cleaning machines. However, it may not be effective for removing certain types of contaminants or stains.
Detergents: Detergents are commonly used in ultrasonic cleaning machines to remove oils, grease, and other organic contaminants. They are available in a wide range of formulations, including alkaline, acidic, and neutral pH.
Solvents: Solvents can be used to remove oils, grease, and other contaminants that are not easily dissolved in water. Examples of solvents that can be used in ultrasonic cleaning machines include alcohol, acetone, and mineral spirits.
Surfactants: Surfactants are substances that lower the surface tension of water, allowing it to penetrate and remove dirt and other contaminants more effectively. They are commonly used in conjunction with other cleaning agents in ultrasonic cleaning machines.
Enzymes: Enzymes are natural proteins that can break down organic materials and stains. They are commonly used in ultrasonic cleaning machines for medical and laboratory equipment cleaning.
It is important to note that the specific cleaning agent used in an ultrasonic cleaning machine will depend on the type of object being cleaned and the type of contaminant being removed. It is essential to carefully follow the manufacturer’s instructions and safety guidelines when using any cleaning solution in an ultrasonic cleaning machine.