
A. Package List
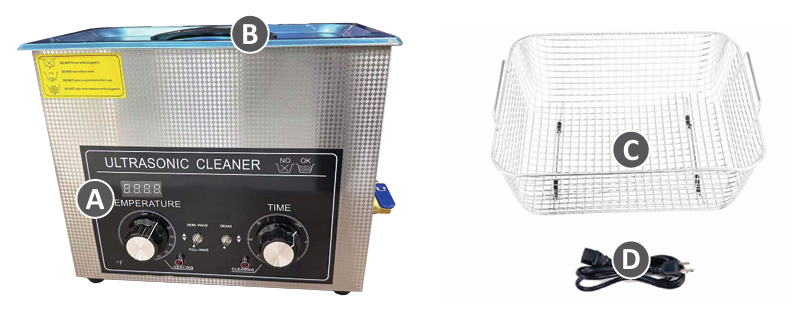
| Number | Item | Quantity |
| A | Main Body | 1 |
| B | Lid | 1 |
| C | Mesh Basket | 1 |
| D | Power Cord | 1 |
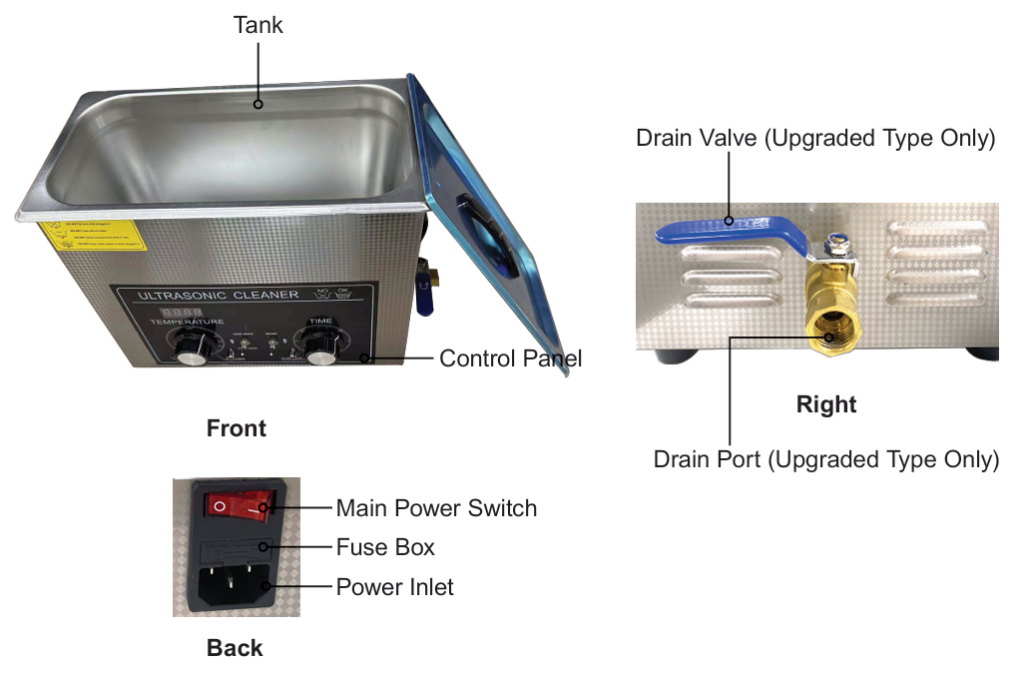
B. Product Diagram
C. Control Panel
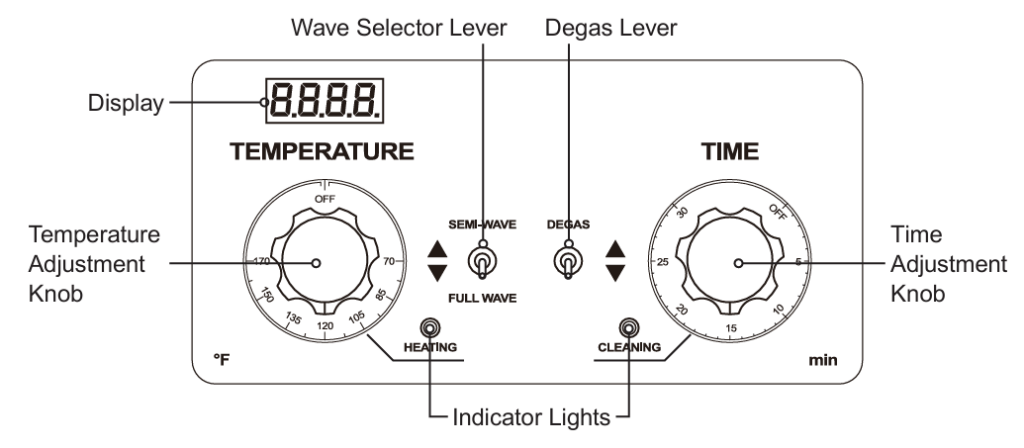
| Indicator Lights | Heating | Turns on when heating. |
| Indicator Lights | Cleaning | Turns on when cleaning. |
| Indicator Lights | Temperature | Sets the temperature. |
| Function Knob/Lever | Time | Sets the oscillation time. |
| Function Knob/Lever | Semi-wave | Cleans in semi-wave mode. |
| Function Knob/Lever | Full-wave | Cleans in full-wave mode. |
| Function Knob/Lever | Degas | Activates/deactivates degas. |
D. Operation
D1. Preparation
- (Upgraded Type Only) Turn the drain valve clockwise to close it completely.
- (Upgraded Type Only) Connect the drain port to a sink or an appropriate container through a drain hose (not included).
- Remove the lid from the top of the ultrasonic cleaner.
- Fill the tank with the cleaning fluid appropriate for your task. Be careful that its level will NOT exceed the ⅖ inches (1 cm) of the top once your items are added. NEVER operate this device with less than ⅓ of its tank height.
- Place the provided mesh basket and its handles in the tank.
- Place the items to be cleaned into the basket gently, ensuring your items are FULLY submerged while the fluid remains BELOW the ⅖ inches (1 cm) of the top.
- Remove excess fluid appropriately if necessary.
- Replace the lid.
D2. Power On
- Connect the device to a stable, compatible, and well-grounded power source using the provided power cord. DO NOT use a 3-to-2 prong adapter or ungrounded extension cord.
- Flip the power switch behind the device to —. The control panel should be displaying the current temperature of the fluid.
D3. Cleaning Procedure
- (Optional) Turn the Temperature Adjustment Knob to select a temperature.
The HEATING indicator turns on. The set temperature needs to be higher than the fluid’s current temperature. The temperature display shows the fluid’s current temperature.
Note:
- You can also perform ultrasonic cleaning while heating, but if the cleaning time is too short, it is recommended to preheat to the set temperature before starting cleaning, or you won’t be able to clean items at the temperature you set.
- Set a temperature slightly lower than your desired temperature if the heating and cleaning functions are to be active simultaneously, as there may be a slight temperature increase during ultrasonic cleaning.
- The actual temperature may be higher than the set temperature while the oscillation is in process. This is normal.
- Choose the proper wavelength using the wave lever. Flip the lever up for semi-wave cleaning, and flip the lever down for full-wave cleaning.
Note:
The semi-wave is a cleaning mode gentler than the standard mode.
The full-wave is the standard cleaning mode. - (Optional) Turn on degas by flipping the degas lever up. When turned on, the degassing is performed after every 9 seconds of cleaning.
- Turn the Time Adjustment Knob to select the time. If no knobs or levers are turned after this, the cleaner will automatically begin cleaning.
Note:
The product may produce some noise while using the cleaning function, but rest assured it’s a normal occurrence.
You can change the cleaning wavelength and turn off or on the degas function during the cleaning process. Changing either the wavelength or degas does not interfere with the normal cleaning.
D4. After Cleaning
- (Optional) Turn the Temperature Adjustment Knob to OFF.
- Flip the main power switch to O and disconnect the device from power.
- Open the lid and remove the basket from the tank. Be careful with hot water vapor, and use tools to take out items.
- Remove the fluid from the device.
- For the basic type, pour out the fluid by tilting the device.
- For the upgraded type, turn the drain valve counterclockwise completely to open it completely,
fully drain the fluid, and turn the valve back in place.
5. Wait till the items have cooled to room temperature and remove them from the mesh basket.
6. Rinse any remaining detergent off their surfaces with clean water as needed.
7. Use a soft cloth to dry the exterior of your items, the tank, and the basket, or allow time for everything to air dry.
8. Replace the basket and lid
E. Maintenance
- Turn off and unplug this device before any draining, cleaning, maintenance, or repair.
- Check the parts of this device for any wear, damage, or malfunction between uses. Repair or
replace any problematic parts before further use. - If this device is not to be used for an extended period, unplug, drain, and fully dry it before storing it in a cool, dry, and clean place inaccessible to children and away from direct sunlight and rain.
F. Troubleshooting
| Possible Problems | Usual Solutions |
| Startup failure or sudden shutof | 1. Ensure the power cord is firmly and fully inserted into the power inlet and a working power source. 2. Ensure no damage to the power cord. Replace it with a new identical one if needed. 3. Ensure the main power switch at the back of the device is in its position. 4. The fuse in the main power switch of the cleaner may have been fried. Contact a professional for repair. |
| Heating failure | Ensure the set temperature is higher than the fluid’s current temperature. |
| Oscillation failure | Make sure you turn the Time Adjustment Knob after setting. |
| Insufficient cleaning performance | 1. Replace the cleaning fluid if it has become too contaminated. 2. Ensure the tank and basket are clean before resuming your work. Clean them as needed. 3. Ensure the cleaning fluid, temperature or time settings are appropriate for your items. |
G. Disposal
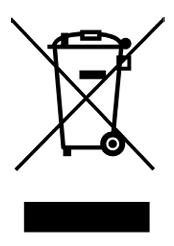
Electrical products should not be disposed of with household products. In the EU and UK, according to the European Directive 2012/19/EU for the disposal of electrical and electronic equipment and its implementation in national laws, used electrical products must be collected separately and disposed of at the collection points provided for this purpose. Locations in Australia, Canada, and the United States may have similar regulations. Contact your local authorities or dealer for disposal and recycling advice.